Pages

Sunday, August 3, 2014

PVC Pipe Curtain Rods


As I sit in my screened-in-porch this lovely Sunday evening with a light breeze and curtains blocking the heat of the sun, I thought I should share another DIY project I recently finished up.

I may have mentioned before, but I will again. This past spring my husband and I had a screened-in-porch added to our home. I've been working hard to furnish and decorate the space with projects like Bianca the Bench and Porch Coffee Table with Built-in Cooler.

We love our new porch. Although, we do not love how close our porch is to our neighbors outdoor area. Oh don't get me wrong, I love our neighbors, however, a little privacy would be nice.  We knew what we were getting into when we purchased a new home in a densely populated area outside of DC.


Additionally, when the sun sets, the lights pours into the porch from this side and is blinding.  So I had plenty of reason to purchase outdoor curtains for our new porch. I even invested in the fancy, real outdoor curtains that are fade resistant, water resistant, machine washable... basically indestructible. I plan to use the curtains year after year. I did purchase the curtains on sale and with a coupon but they still were not cheap.

Then the time came to figure out how I would hang the curtains. I was determined to find a cheaper way to create an outdoor rod than these expensive rods, since I needed about 50 ft to cover the perimeter of the porch.  After significant pinterest research and a trip to the hardware store, I found a solution and developed a plan = PVC Pipe.  I found this site helpful for the rod brackets.

I'll start with the brackets. Below is my list of material:
  1. EMT 1-1/4 in. 1-Hole Strap (4-Pack) $2.00
  2. Everbilt 4 in. Corner Braces (4-Pack) $7.24  (Rust Resistant for outdoor use)
  3. Everbilt round head combo, 1/4 in - 20 x 5/8 in 5 pack, which I can't seem to find online but I assure you were less than $2.
  4. Rust-Oleum Painter's Touch 2X Flat White General Purpose Spray Paint $3.87
So for about $15 + Tax, I created 4 brackets in the color of my choice!   Full disclosure, the corner braces did come with screws. However, I did purchase 1.5" screws because I wanted to make sure I hit the wood behind the inch wide synthetic decking material that wraps my porch frame.


Yay! I have a curtain rod bracket up!
Lets move on to the actual curtain rods, shall we?  So have you looked at PVC pipe lately? Have you checked out how ridiculously cheap PVC is and how many connecters exist for the pipes! It is amazing!  Allow me to break down the cost. Below are my list of materials for the rods for one side of my porch perimeter:

  1. (2) 3/4 in. x 10 ft. PVC Schedule 40 Plain-End Pipe at $2.46 / each
  2. (1) 3/4 in. Schedule 40 PVC Coupling for $0.27 / each
  3. (2) 3/4 in.  PVC End Cap ~$0.36 (I couldn't find a link online)
  4. Rust-Oleum Painter's Touch 2X Flat White General Purpose Spray Paint $3.87 (Yes, you need an additional can!)
So for about $10 + Tax, I created 20 feet of outdoor curtain rod in the color of my choice! Oh, one last thing. I forgot about cutting PVC. We just happened to have a PVC cutter at home, but these are cheap at the hardware store.  I do recommend purchasing a cutter because it made life so much easier being able to cut and re-cut the PVC whenever I needed to.

PVC Cutter


I have outdoor curtain rods!  Still needs a coat of paint.


One word of caution. PVC is a little flexible so be sure to add a bracket every 3 to 4 feet, otherwise you will see a slight curve in the rod when the curtains are closed.

After a couple of coats of spray paint, no one would ever know your curtain rods are made of PVC. 


Curtains to the Rescue!  Protection from the blinding sun!


Keeping cool in the shade

Happy DIY'ing!

Sunday, July 13, 2014

Bianca the Bench


My buddy Dip and I embarked on re-purposing discarded dining room chairs into a bench. This blog served as our inspiration: http://www.raisingdickandjane.com

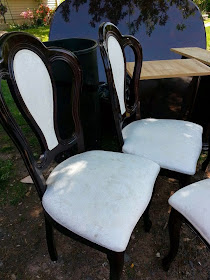
Dip found the starting foundation to the bench - two discarded dining room chairs.

Discarded chairs found in the trash pile


Once we got them in the workshop (aka garage), we removed the seat cushion and backing fabric.
First things first - remove all the fabric.

Use pliers to remove fabric staples

Meet my new miter saw!  I named her Melanie miter.  She is my best pal when I need to cut wood.

To avoid putting a screw through the chair frame, we added additional framing to the existing chair seat supports. 


Then we flipped the chairs over on top of the wood boards to use as seats and screwed the boards into the supports from the bottom to avoid visible screw heads. The boards consist of a 1x6x8 piece of pine that we had cut in half at the hardware store, leaving two 48" boards to use as the bench seat.


We used a spacer between the boards

We used wood clue to secure the middle piece as well as the front and back rounded edges. 


Clamps used to hold pieces in place
 After everything dried, it was time for sanding.

Because the chairs had a very glossy black lacquer finish, I spent a while sanding to ensure a dull finish for the primer to sink into.

I primed the chair frames before painting with an exterior paint.


Meet Bianca the Bench! Isn't she a beauty! She is wearing BEHR in the color Spring Stream. She found a new home on our porch and will serve as seating for the dining area section.


Happy DIY'ing!

Monday, June 23, 2014

Porch Coffee Table with Built-in Cooler


My buddy, Dip and I made this coffee table with inspiration from Ana White's full sized version. The story behind the table started at Home Depot.  My husband, Dip, his wife Amber and I were looking at outdoor furniture.  We found a set we liked but I didn't like the coffee table.  I convinced my husband that Dip and I could make a way cooler coffee table.  Despite the eye roll, my husband agreed to let us make the table.

We got a lot of use out of my new miter saw on this project.  However, we had the hardware store cut the large boards used for the table top.  The length is 48" because we took an 8' long 8"x1" board and had it cut in half.

The beginning of the table top

This is the planter box we use in the cut out middle section. I have a couple of these planter boxes so I can switch between plants and a drink cooler. 


We used a bunch of steel tie plates to keep the table top together. They were cheap at $.58 a piece. I am not sure if I will use them again because the table top was flimsy until we secured the legs and skirt boards.


We crafted our own style of brace for the planter.  The construction of the brace was more my buddy Dip's creation. I just followed along. I couldn't tell you what cuts to make and where... his mind is a complicated beast.


We decided to add a skirt made out of two levels of 1"x 3"  to cover the planter brace and to provide better over all stability.

Time to add some table 2x2" legs!

This is Dip. He was working on the cover for the center cut out.  We added a drawer handle for easy removal.


All put together. Still needed a coat of paint to protect the table from the elements. 


I used BEHR premium plus ultra exterior paint in the color Spring Stream.  I have a green / turquoise color theme going on in the screened-in-porch.  I pushed the screws in further around the table legs and skirt.  Then I filled the screw head indents with spackle because I knew the paint would cover the white spackle.

Option 1: Closed top for the most surface area


Option 2: Planter Centerpiece


 Option 3: The drink cooler
My husbands personal favorite


To avoid a lot of excess water and moisture due to ice, I purchased these reusable ice cubes to use in the drink cooler.  I must give Amber (Dip's Wife) credit for this genius idea.

And a special shout out to my Grandma and Sister for helping make all the pretty pillows you see on the chairs. Thanks G & Ash!

Friday, June 6, 2014

Vintage Metal Chair Makeover


I've been on the look out for seating options that I could use in our new screened-in-porch.  I mentioned the Habitat for Humanity Restore before.  I may have a small obsession because I peruse through the Restore on a nearly weekly basis at this point.  You never know what you will find and when the price is right, one can find some great deals.

For example, I picked up a pair of vintage metal fold-able chairs for $15.  These late 1950's vintage gold tone metal folding chairs are sturdy and still have plenty of life left in them.

1950's Vintage Chair

One advantage to older constructed chairs is their simplicity.  The vintage chairs are really simple to take apart.  I gave them a good scrub including the vinyl seat material, which are still in decent condition.


Because I planned to use these chairs outdoors, I coated them with UV-Resistant, non-yellowing Rustoleum.


I gave the frames two coats of Rustoleum and also coated that chain linked table you see in the background.  I found that little chain table on sale at Home Goods.


I switched out the seat cushion batting with a polyester batting which is mildew resistant.  I found the polyester outdoor fabric on sale at Joann's online. 


I decided to keep the original vinyl material as an extra layer of water resistance.  I added the outdoor fabric over top.


Here is the final product.  The pair of chairs is a small but good start to my future seating and dining areas on our new porch.

Pair of 1950's Vintage Chairs

Daphne likes the chairs too