Showing posts with label chalk paint. Show all posts

Sunday, February 8, 2015

Think Beyond the Vase


It has been a very busy few weeks with several out of town trips. However, yesterday I hosted a bridal shower for a good friend of mine, Marje.  I am honored to be her Matron of Honor for her upcoming wedding.  I gave the shower a baking theme because my friend enjoys getting her bake on.

The Bride to Be poses with some of my out door shower decorations. I used chalk paint to paint the flower pot. I found chalk paint paper and added a "Welcome, please come in" message to the middle of the door wreath.

I used my faux photo canvas technique to create personalized photos from the brides engagement photos. The Bride To Be banner and the other matching banners seen in these photos came from etsy seller, BannerCheer. 

Eat, Drink, Get Married. I've had these chalk painted wine bottles for years. In fact, they are the very first chalk paint project I ever did. And I am still using them!  I love using chalk because rather than purchasing themed decorations, I can erase and create my own personalized decorations.

 More chalk paint. This little piggy hangs in my kitchen and I change it for the seasons.

The Food! Yum! I added a bunch of paper fluff, bells and lanterns to the chandelier along with some tulle down both sides. 

Check out the Veggie dip in their own individual cups with dressing. These were a big hit! The fruit pizza were another fan favorite.

 The cucumber and cream cheese sandwich hearts were a favorite. I ran out of them very quickly.

The Kitchen-Aid mixer center piece paired with cheese grater vase were my favorite. I used a wet flower foam to help place the roses in the wide mouth mixing bowl. 

Champagne + OJ = Mimosas! You can never go wrong with Mimosas! I also added red and white wine, sparkling cider, a variety of soda, and water. Lots of options to make everyone happy!

The brides first name starts with an M. I filled this industrial M shelf with mini photos of the couple.  The tree log to the left is my first experience with wood burning. It is tough to see but I burned the couples initials and their future wedding date.

I skipped the traditional sign-around-the-photo idea for a more kitchen themed write-on-the-spoon idea. Everyone enjoyed writing on the spoons. I plan to put them together in a sort of collage for the bride.

My words of wisdom :)

I arranged a bunch of items into a personalized vignette with a baking theme.

 I gave away these mini heart whisks as party favors. Super cute! They came prepackaged with a ribbon and little "Thank You" tag so no extra work for me!


In lieu of traditional bridal shower games, I hired the awesome Aubergine Chef to provide a butter cream icing demonstration.

After the icing was made, it was time for all the guests to get a try at creating beautiful icing flowers on cupcakes.

The Chef made it look really easy.

Everyone really enjoyed the interactive demo and dug right into creating their own works of art.


The Bride with her cupcake and personalized apron!


My friend Amber, decided I needed my own cupcakes. So she made me these. Thanks Amber.

Overall the bridal shower was a great success. I received many compliments on the special touches I added which was nice to hear. I've been planning this event for a long time now and it was great to see everything come together.

Friday, January 2, 2015

Thift Store Chair Makeover


Happy New Year Friends!

I apologize for my complete lack of posting anything in the past several months. Life got away from me and my creative juices nearly shut down. While I have completed a few small crafty projects, I haven't had the time (or energy) to work on anything big until recently. I was lucky to have two weeks off of work for the holidays and I spent some quality time with pinterest to spark my creativity.

I came across a few posts on fabric painting with chalk paint, which piqued my interest because I have extra chalk paint and I have been fawning over gorgeous wingback chairs for a while now. My library room is the first room you see as you enter my home and it is lacking seating. While visiting my favorite thifty store, the Habitat for Humanity Restore, I found a wingback chair in great condition with one exception - the fabric. The chair price was lowered to $35! Score!

Wingback in need of a face lift
I pulled out the chalk paint from the garage and blew off the dust. It has been too long since I have played with chalk paint. The colors I used are Old Ochre and Old White.


Before painting, make sure to clean the chair of any stains or dirt. I gave my chair a good vacuum and cleaned any dirt spots.

I did a lot of research online before starting this project. I learned that one must add water to the chalk paint in order to thin it out and ensure the paint will soak into the fabric. So I added enough water to make the paint look the consistency of milk. Then I used a spray bottle of water to wet the fabric directly. I used that spray bottle a lot on the first coat to smooth out the paint.

Use a spray bottle to wet the fabric

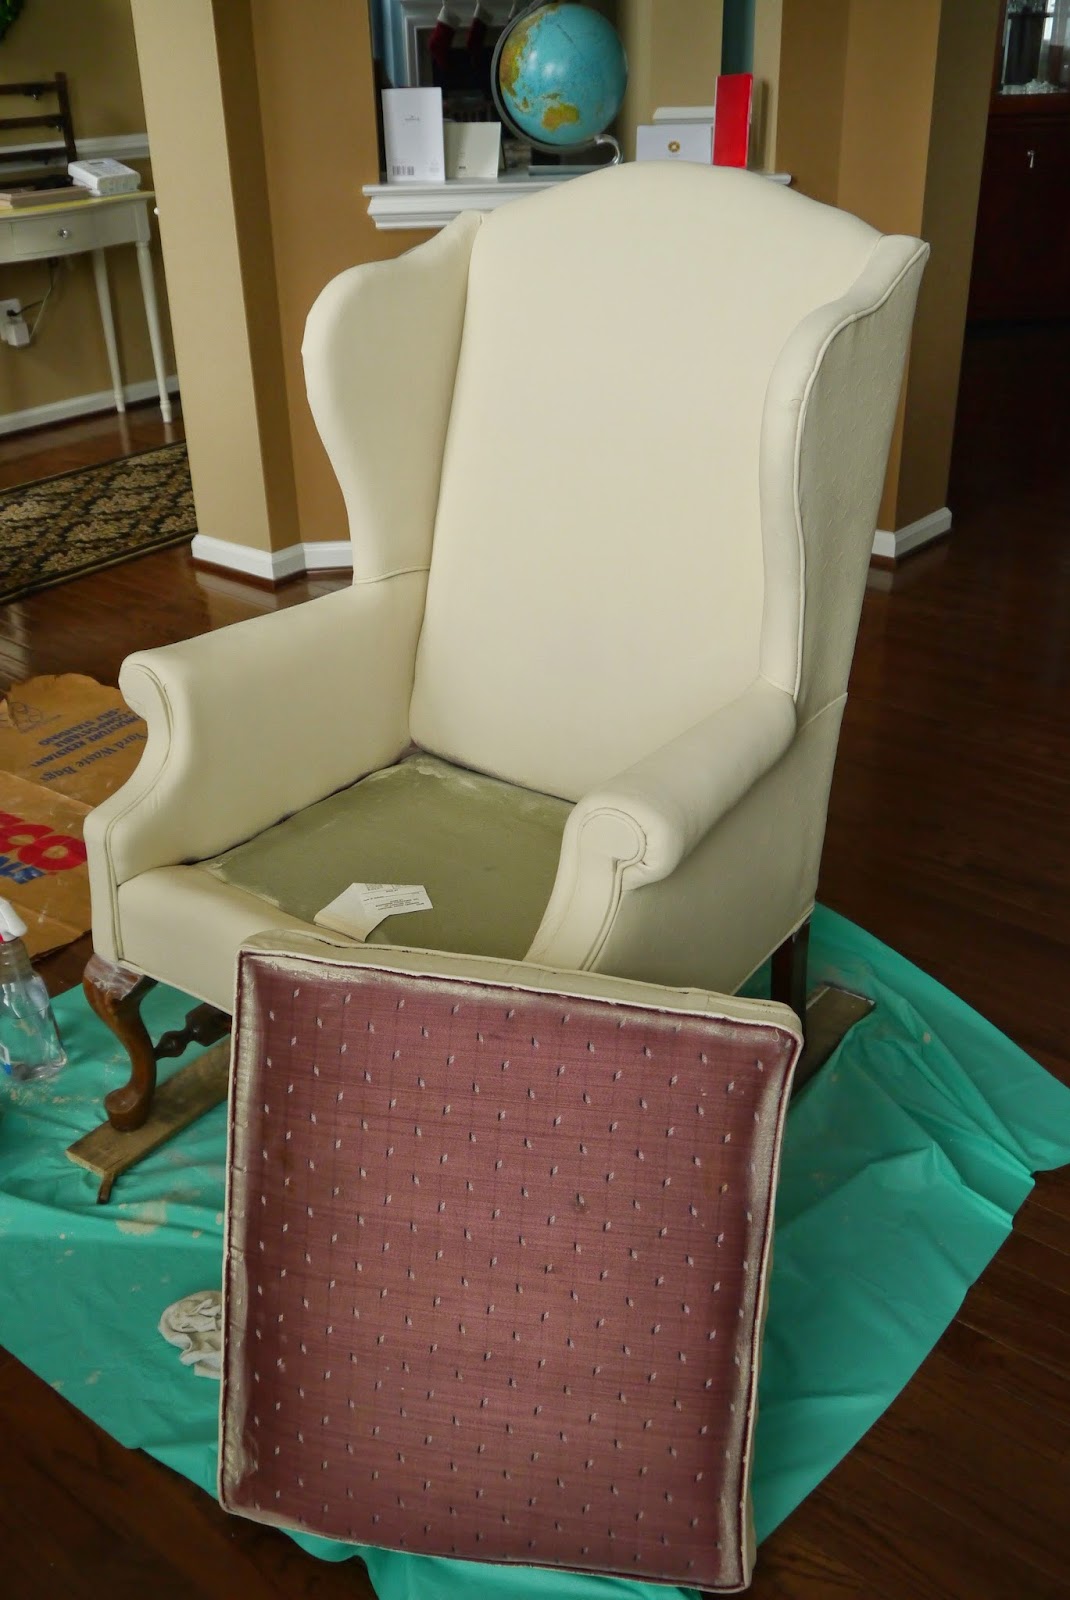
Starting the first coat.

I left the bottom of the cushion unpainted to show my progress. The first coat was very streaky and took a while to dry because I used a lot of water. I let the chair dry overnight before attempting the second coat.
First coat completed!

I still diluted the paint on the second coat to a milk consistency. However, I did not use the spray bottle as much on the fabric because of the first coat of paint.


Starting the second coat


 The second coat of paint covered a lot better but still had some streaks.

Second coat complete!

 The final coat of paint! I was surprised at how "soft" the chair looked. The coverage was great too!

Final coat of paint

I used the Old White chalk paint to color the trim. So fancy!

Added Old White to the trim

Be sure to apply a thin coat of clear wax, which both seals the paint and softens the fabric. At this point the chair fabric has the suppleness of outdoor fabric. I also applied non-diluted Old White chalk paint to the chair legs/frame.

I may go back and distress the chair legs/frame at some point. However, I am happy with the look for now. I am curious how long the painted fabric will handle the daily use. So far so good!

Take Care!

Wednesday, April 2, 2014

Spring has sprung!

I am finally coming out of hibernation!  We have had a tough, cold winter that has kept me inside and suppressed my creativity.  The weather is finally starting to shift into spring and I can tolerate working in the garage - although, I should clean the garage out at some point.

Anyway, this past weekend I finished two small projects.  I have a few pairs of old wooden shutters lying around in the garage.  For months I've had an idea in my head to use the shutter as a mail organizer/command center sort of thing.

Old wooden shutter from a Habitat Restore for $5
I used left over Chateau Grey chalk paint, which is a muted green/grey color.  After a small amount of distressing, I added a coat of clear soft wax.


I added a few hooks to hang extra keys and used wooden mini chalk board clothes pin labels.  This organizer is a great way to keep cards, bills and coupons off the counter.  I did a quick search on etsy for a shutter mail organizer and they sell for $30 and up.  I spent $5 for the pair of shutters, which means I still have one side left. I used left over paint and wax. I purchased the silver hooks for ~$1.70 at the hardware store.  I hung the organizer with Command removable picture hanging strips so I could remove the shutter without damaging the cabinet.

Finished shutter mail organizer

In addition to the shutter project, I updated my small wall gallery with nautical themed canvas.  I am sort of obsessed with nautical themed everything right now... anchors, rope, blue/white strips, etc. 


I used mod podge to adhere the images to blank canvases. Then added a black paint border with a sponge.  I've done this before and it is a fun, easy project.


For those keeping score, I made the currency collage a few years ago as a way to display all the currency I've collected while traveling.  I also created the subway art image used in the top right display which includes all of the places my husband and I have traveled together.

That's all for now!  I hope spring is here to stay.

Sunday, October 27, 2013

Desk Reborn

Inspired by one of my favorite blogs Miss Mustard Seed and many of the blogs linked to her site,  I recently embarked on my first crack at chalk paint with an old, drab wood desk found on craigslist.  The poor desk was screaming for a makeover!


Blah wood desk
I sanded the top of the desk down to the raw wood to remove the old finish and imperfections. In hindsight, I could have used a paint stripping gel as an alternative, but the sander got the job done.

Bye Bye Blah
I used Annie Sloan Chalk paint in Pure White and Duck Egg blue. I mixed the colors to create a subtle ombre effect on the drawers. I used a walnut stain on the top with pure white chalk paint to outline the desk top.

Desk on its way to greatness
Two coats of stain and two coats of paint later, I lightly distressed the piece and finished the desk with Annie Sloan clear soft wax. Additionally, I spray painted the drawer pulls to rubbed oil bronze so they all match.

Can you see the subtle ombre drawers?

Rubbed oil bronze drawer pulls/knobs

What I learned:
  • Chalk paint is expensive but saves time because no sanding or varnish stripping is required.
  • Chalk paint clean up is simple because it is water soluble.
  • The white chalk paint does not cover as well the colored paint. I’m not sure if it was just the can I had, but I could never get the white paint to mix properly. I stirred it a lot with a metal spoon but there were still chalk lumps.
  • The clear wax is no joke. Get a good waxing brush and watch online tutorials such as Simple Reinvented.